A sitemap is an outline of your website that provides key information about your files, including the structure of your URLs, their crawling priority, and the publishing dates of your posts. It’s a list of your pages that help search engines find, crawl, and index your content.
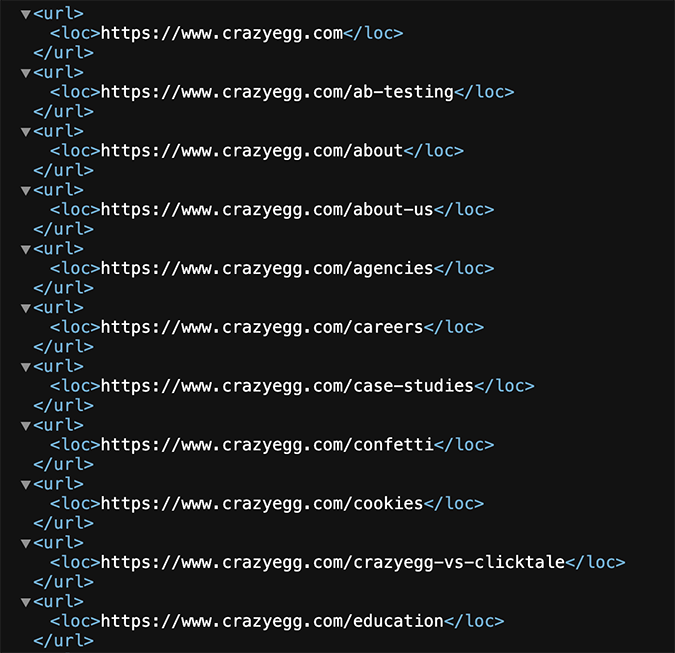
Sometimes, a sitemap could technically include the HTML structure of your site. However, when most people talk about sitemaps, they typically refer to the XML sitemap that’s automatically generated.
Sitemap Benefits
The main benefit of sitemaps is to help Google and its search engine competitors discover all your content. That’s all there is to it. Sitemaps are meant for search engines, not for site admins to experiment with.
Lastly, and in my opinion, every site should have a sitemap. Despite Google’s claims about smaller sites with fewer than 500 pages not needing a sitemap, there’s no need to leave the success (both technical and traffic-wise) of your website up to random chance.
Automated vs Manual Sitemaps
Generally speaking, there are two types of sitemaps: automated and manual.
The truth is, there’s no reason to maintain a manual sitemap. Use a plugin like Yoast to generate one for you. Barring a few outliers who like to operate outside the widely adopted consensus, no serious SEOs spend any time maintaining sitemaps manually.
Automating a sitemap is easy. First, make sure your sitemap is set up properly by using one of the methods below. Then, let the plugin handle all future sitemap maintenance unless something unpredictable throws your site out of whack. If that happens, you’ll probably have more urgent things to worry about anyway.
How to Find Your Sitemap
Knowing how to find your sitemap is useful information to have. It can always come in handy for a variety of reasons, including when your plugin stops working and you’re forced to perform manual changes like fixing, updating, or removing old URLs and conflicting metadata from your sitemap.
Other reasons for accessing your sitemap include:
- Submitting it to Google if it hasn’t been automatically indexed
- Finding and replacing an outdated sitemap
- Getting a detailed version of your site’s HTML structure through an XML sitemap
- Identifying orphan pages that aren’t internally linked to other pages on your site
- Double-checking your sitemap for technical errors
You can find your sitemap in three main ways:
- By checking common URLs manually
- By checking robots.txt
- By checking Google Search Console (GSC)
Here’s a more detailed breakdown of all three methods.
Checking common URLs manually
The first method allows you to type the sitemap’s filename after the top-level domain in the URL of your website. There are several sitemap naming conventions that you need to check, including:
- https://www.example.com/sitemap.xml
- https://www.example.com/sitemap1.xml
- https://www.example.com/sitemap_index.xml

If you still can’t find your sitemap after typing all of these filenames in your browser’s address bar, it’s either that you don’t have a sitemap or your sitemap is created under a different filename.
Checking robots.txt
Most modern websites have a robots.txt file. A robots.txt file contains information, rules, and directives that tell web crawlers how to access and index pages, directories, and media files on a site. As a good rule of thumb, it should also include a link to the sitemap to speed up the crawling and indexing process as well.
You can easily find the robots.txt file by typing the following URL convention in your address bar: https://www.example.com/robots.txt.
When you gain access to the robots.txt file, search for a line that contains the following sitemap file naming conventions:
- Sitemap: https://www.example.com/sitemap.xml
- Sitemap: https://www.example.com/sitemap1.xml
- Sitemap: https://www.example.com/sitemap_index.xml
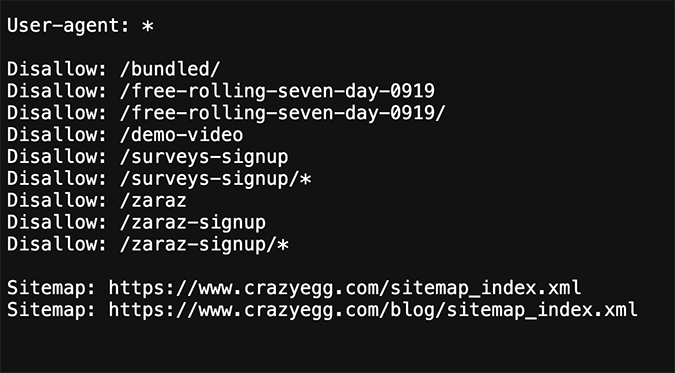
If you can’t find the sitemap, it means that either your website doesn’t have a sitemap or your sitemap isn’t declared in the robots.txt file.
Checking Google Search Console
Another easy way to find your sitemap is by checking your Google Search Console (GSC) account.
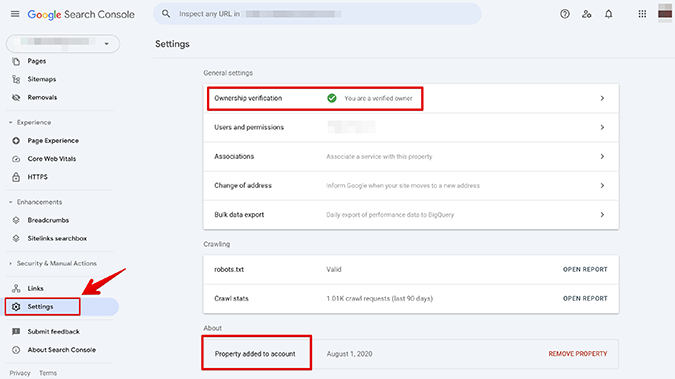
First, make sure your website is connected to GSC. To check this, navigate to https://search.google.com/search-console, log in to your main Google account, and pick Settings from the GSC menu on the left-hand side.
Once you’re here, make sure the Ownership verification field shows that you’re a verified owner and that your selected property is successfully added to your GSC account.
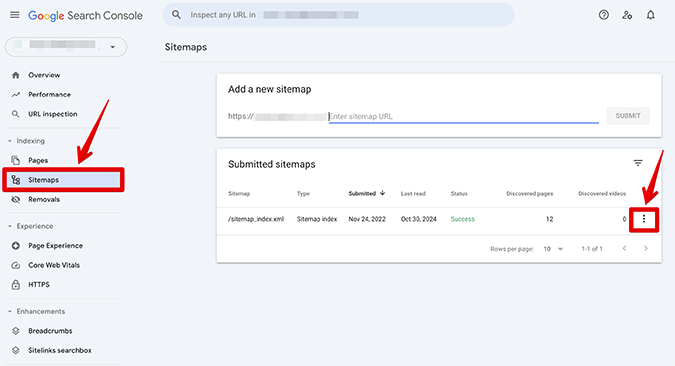
Next, click on Sitemaps from the main menu and GSC will show a list of all submitted sitemaps and their current status for your selected property.
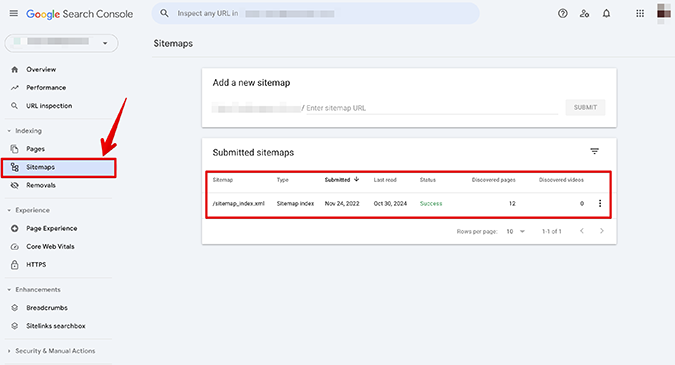
If the list under Submitted sitemaps is empty, it means that your sitemap isn’t submitted to your Google Search Console account.
How to Set Up a Sitemap for WordPress
Blogs, affiliate-based online businesses, and sites that focus on content are predominantly using WordPress (WP), so this method should cover most needs for setting up a working sitemap.
If you run version 5.5 and above, WordPress will automatically generate a core XML sitemap for your site. In this case, you can find your WordPress sitemap by typing /wp-sitemap.xml after the top-level domain in your URL: https://www.example.com/wp-sitemap.xml.
However, this is only a basic XML sitemap and, again, it’s not something you should leave up to chance.
A more reliable approach is to use a plugin. We prefer using the Yoast SEO plugin to generate a sitemap.
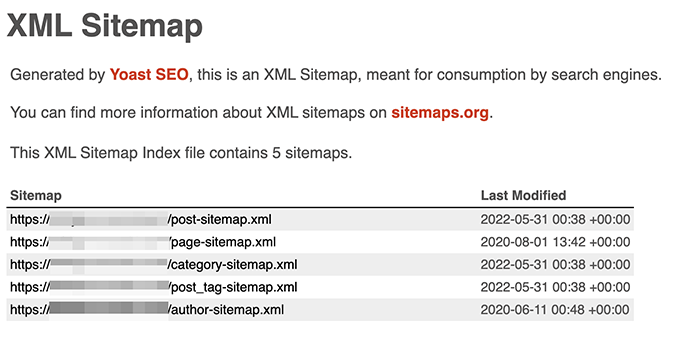
Here’s how to add a sitemap with the Yoast SEO plugin in WordPress.
First, log in to your website as an administrator. You will be taken to your WP Dashboard.
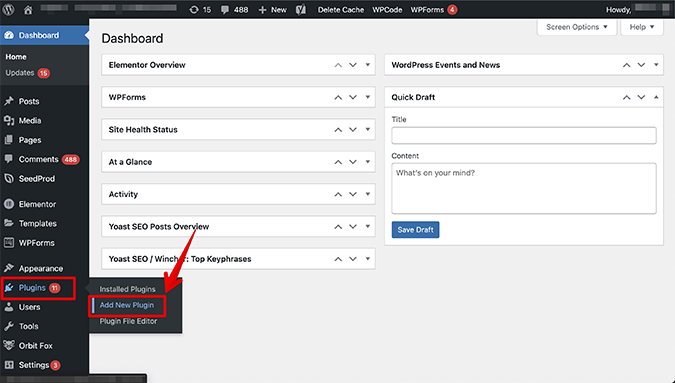
Next, go to Plugins, Add New Plugins.
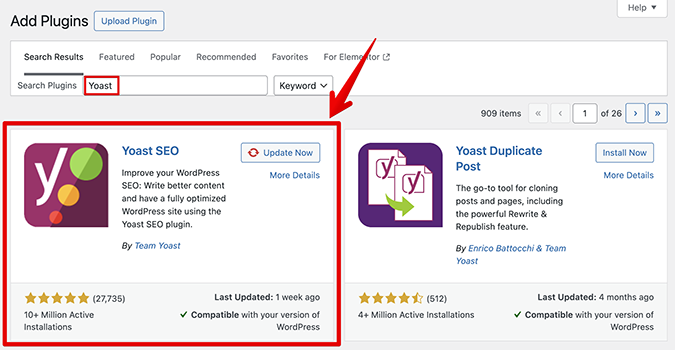
Type Yoast in the search bar, locate the Yoast SEO plugin, and click on Install Now.
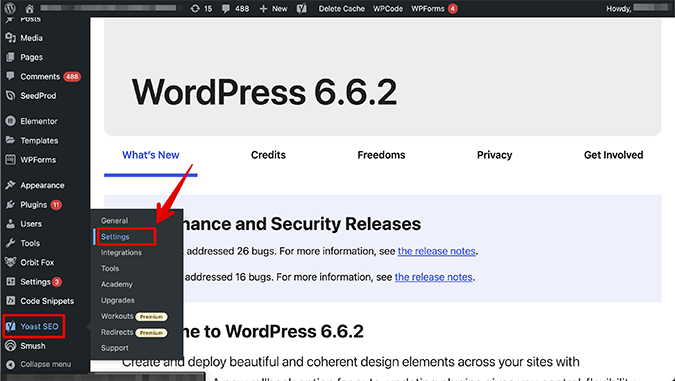
After the installation is complete, navigate to Yoast SEO and click on Settings.
Scroll until you find the XML sitemaps card and toggle the Enable feature switch on.
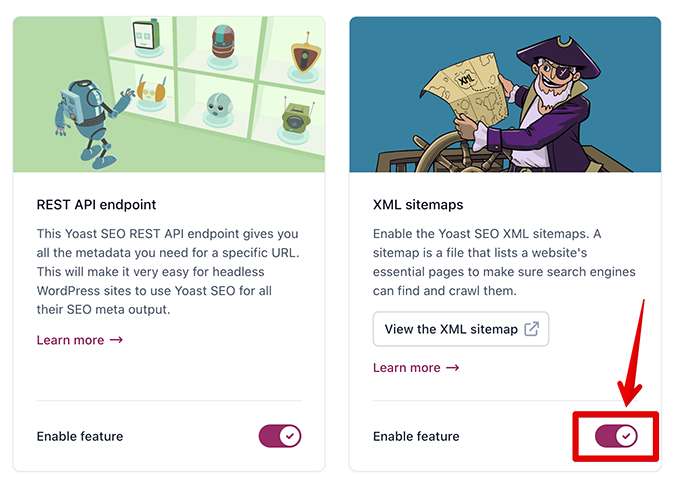
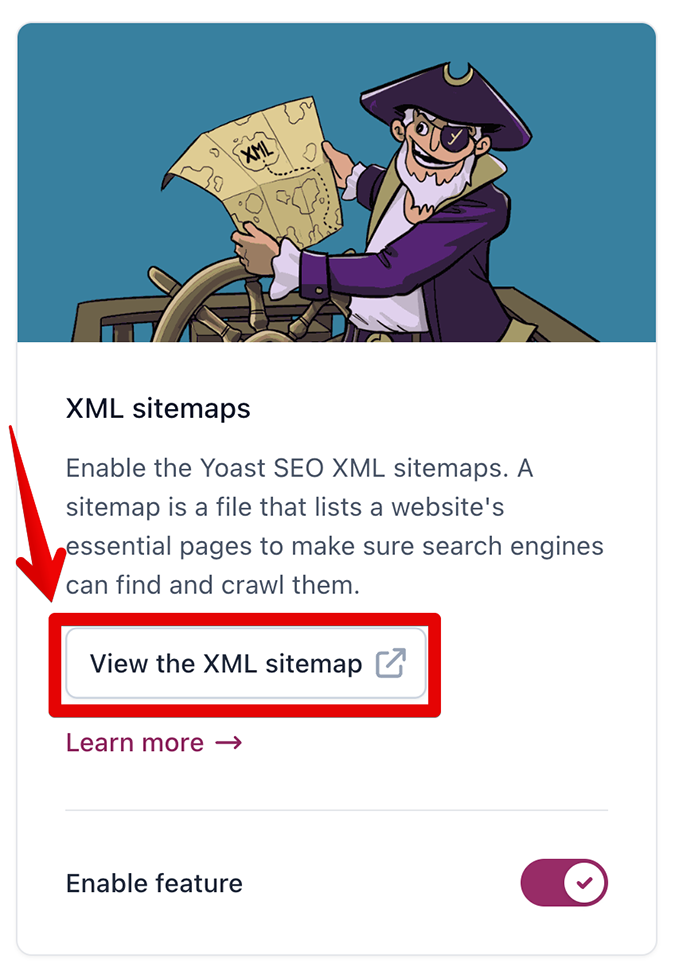
Yoast will automatically generate an XML sitemap for your site. If you want to view your sitemap, click on View the XML sitemap button on the same card.
Avoid using weird, third-string plugins—especially with everything that’s currently going on with the WordPress community. I’ve personally had sitemaps get all messed up from a plugin that wasn’t being maintained. Use a tried-and-true plugin to manage your sitemaps automatically.
For example, a plugin like Yoast will submit your sitemaps for you. Its base version offers a free sitemap solution that saves you countless hours of unnecessary work you can allocate to more important things, like writing content, A/B testing, and promoting your top pages.
How to Set Up a Sitemap for Shopify
Currently, it’s not possible to change, remove, or upload your own XML sitemap to your Shopify-powered website.
Instead, Shopify automatically generates a sitemap.xml file when you create your online store. It contains links to all of your products, product images, collections, pages, and posts.
Shopify’s auto-generated sitemap is reliable in a way that it makes live updates whenever there are new changes to your website, but also limiting because you can’t adjust or edit your sitemap manually if you need to.
To navigate to your Shopify sitemap, type /sitemap.xml after the end of your site’s main URL, like this:
https://example.com/sitemap.xml
Shopify treats the auto-generated sitemap index file as a parent sitemap that links out to other sitemaps on your site. These links are known as child sitemaps and there are typically four of them that represent four distinct category types:
- Product Pages
- Collection Pages
- Pages
- Blog Posts
Below is an example sitemap.xml file, this time from Goodfair’s store:
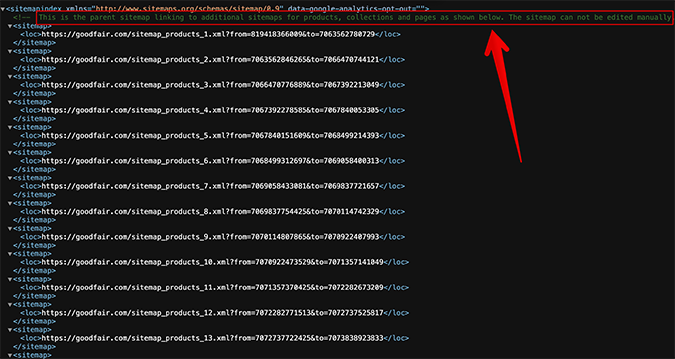
If any of the initial child sitemaps exceed 10,000 entries, Shopify will auto-generate a new child sitemap to house those additional URLs. On top of that, sitemap.xml file types can’t exceed 50,000 URLs, so this is Shopify’s way of getting over that hurdle for large websites.
You can learn more about finding and submitting your Shopify sitemap to Google Search Console by following this Shopify and GSC guide.
How to Check Your Sitemap for Errors
If you’re on WordPress and are using a quality plugin, the sitemaps will work automatically. For Shopify users, the sitemaps will also update automatically to reflect the URL requirements of your site.
Occasionally, however, there might be issues you want to address. To be sure your pages are properly indexed, go to Google Search Console and double-check the live state of your sitemaps.
Here are some common problems to look out for:
Removing extra sitemaps
Problem: Are there a bunch of unique sitemaps that you don’t recognize? We’ve had this happen, where a plugin was creating 4 unique sitemaps when there should’ve only been one.
Solution: If possible, remove the unwanted extra sitemaps from GSC by navigating to Sitemaps, selecting your sitemap, clicking the three dots at the right-hand side, and selecting Remove sitemap.
Sitemap errors
Problem: Is Google Search Console listing any sitemap errors like not being able to fetch your sitemap?
Solution: If the answer is yes, make sure your original sitemap filename and the name in GSC match.
If that doesn’t solve the problem, use a tool like XML Sitemap Validator to validate your sitemap, and try submitting it to GSC again. Also, make sure to purge your website’s cache and check if your sitemap index file is located in the right root directory by typing its name in your browser’s address bar.
Abnormal number of pages
Problem: Does the number of pages detected in the sitemap roughly match your site size? It’s never perfect, and a gap of 5-10% is allowed. But if 80% of your posts are missing, that can be a real problem.
Solution: Check if your posts are set to index. If some or all of your posts are set to noindex, you will see a big discrepancy between the number of pages in your sitemap and the number of published pages on your website. This can be done either with a plugin, which we recommend or by manually editing your robots.txt file, which we don’t recommend for beginner users.
Ultimately, if you do encounter a problem, the most common fix is to use a better plugin and save yourself some precious time.


