Nothing screams “untrustworthy” more than a website labeled by web browsers as “Not Secure.” Getting rid of it requires an SSL certificate (technically TLS these days), which is a badge that assures visitors your website is safe to use. The best part is you can get it for free, and we’ll show the exact steps to set it up even if you’re not tech-savvy.
Why Getting an SSL Certificate is Worth It
Secure Sockets Layer (SSL) is the name everybody still uses, but modern certificates actually use its successor, Transport Layer Security (TLS). Either way, it’s a protocol that ensures whatever information is transmitted between the visitor’s browser and your website’s server is converted into codes that no third party can decipher.
Let’s say Location A (visitor’s web browser) wants to send sensitive data to Location B (your website server). With an SSL certificate, Location A encrypts the data with a public key to ensure only the intended receiver can read it. Once Location B receives the data, it can decrypt it using a corresponding private key.
Any data encrypted with a public key can only be decrypted by a private key and vice versa. This ensures every data transferred between the visitor’s web browser and your website will always remain confidential.
By contrast, a website without an SSL certificate means attackers on the same network can easily eavesdrop on every communication. Without a security protocol blocking them, cybercriminals can steal credit card information and other sensitive personal data. If you own an ecommerce store, membership site, or any website requiring users to register or pay, an SSL certificate is a mandatory feature you can’t afford not to have.
Maybe you think you don’t need one because you only have a simple website that doesn’t accept payments. If you think you can get away without an SSL certificate, Google has a warning: get the certificate or scare your visitors away with a “Not Secure” notification to users. Modern Chrome versions even replaced the lock with a neutral “tune” icon for secure sites and focus more attention on warning users when a site is not using HTTPS, so unsecured pages stand out more than ever.
The Investment Needed to Get an SSL Certificate
SSL certificates are issued by certificate authorities. For years, basic certificates commonly cost $50 to $100, and business-validated options could cost even more. Today, most website owners don’t have to pay anything—nearly every major host now provides free, automatically renewing SSL certificates through providers like Let’s Encrypt or ZeroSSL, and you can also get 90-day certificates directly from them for $0.
Paid SSL still makes sense for some organizations—especially if you need organization or extended validation, higher warranty, or specialized support. Those usually start around $60 to $200 per year depending on features, brand, and number of domains.
Fortunately, companies like ZeroSSL and non-profits like Let’s Encrypt offer SSL certificates for free. By giving away SSL certificates, they create social good and turn the internet into a safer place for everyone.
However, manually installing the free certificate on your own still requires basic server access. Most hosting companies are now SSL-ready, though, and you can easily add the certificate from your hosting control panel through a streamlined process.
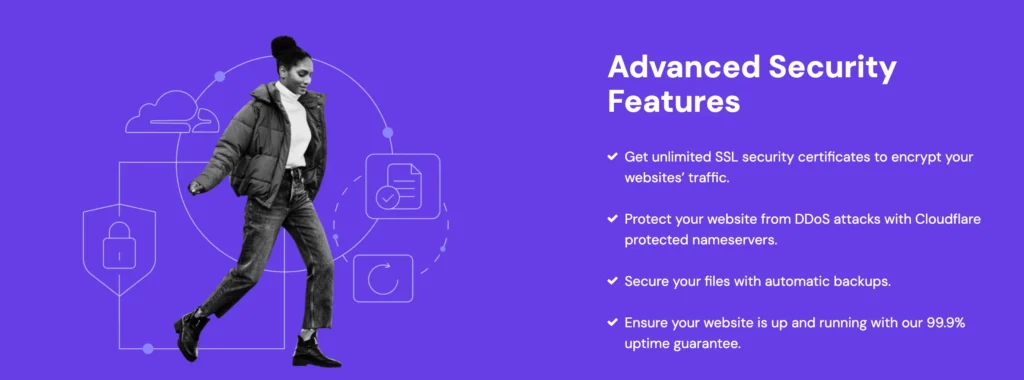
If you’re looking for a web host that offers free SSL, we recommend Hostinger. It’s also our top recommendation for the best cheap web hosting, so it’s definitely a steal for anyone starting a new website. All of Hostinger’s hosting plans come with free, automatically installed SSL to help anyone with a website idea get off on the right foot.
Rather than having to get hosting and an SSL from two different providers, Hostinger makes it so much easier—and it’s free with your hosting subscription.
8 Steps to Getting an SSL Certificate
Setting up an SSL certificate may require a small investment of your time, but the reward can be enormous for your website and visitors. Here, we go through how to make your website secure in a few steps.
#1 – Determine the level of security your website requires
SSL certificates come in many forms. Some are free, while others cost more. The higher the validation level, the more identity checks are involved—not necessarily stronger encryption.
You must know what you’re looking for. This way, you won’t end up buying a costly SSL when your website can thrive even with a free certificate. In summary, here are the four basic types of SSL certificate:
- Domain Validated (DV) Certificate – provides encryption for only one domain or subdomain and verifies domain control. This is where most free SSL certificates fall under, making it the ideal choice for blogs, small business websites, and ecommerce sites with basic security needs.
- Organization Validated (OV) Certificate – as its name suggests, OV certificates are designed to verify that the domain name truly belongs to a business or organization it represents. If the website is owned by a legitimate business, government organization, or nonprofit, you can get this certificate to assure users they’re not dealing with an online impersonator.
- Wildcard Certificate – is a multi-domain certificate that covers your domain and all of its subdomains. If you have multiple subdomains, having a wildcard certificate is more practical than installing one DV certificate after another.
- Extended Validated (EV) Certificate – provides the highest level of identity verification. Browsers no longer show the old green address bar for EV certificates, but users can still see the verified company name after clicking the site information icon next to the URL. It’s best for websites that accept credit card payments and where sensitive user information is exchanged.
Once you have figured out the SSL certificate your website needs, it’s time to shop around for a certificate authority that issues it.
#2 – Check with your hosting company to know what SSL certificate is available for you
Securing a website typically involves getting an SSL certificate directly from a certificate authority. Fortunately, almost all hosting providers now offer or resell SSL, and many of them install it automatically through Let’s Encrypt or ZeroSSL, so you won’t have to deal with a third-party organization.
Hostinger, for example, comes with unlimited free SSL certificates with all of its web hosting plans—even its entry-level Single plan. The best part is that Hostinger also offers impressive and affordable web hosting, so you can start a secure, professional website even if you’re on a shoestring budget.
You’ll see this during the checkout process when you’re signing up for a new hosting plan.
Hostinger automatically assigns and installs the SSL to the domains associated with your account. So you shouldn’t have to do anything other than confirm it’s active. The vast majority of SSL certificates on Hostinger are installed automatically. But sometimes you need to do it manually, which is also very easy:
- Sign into your Hostinger control panel.
- Navigate to the Websites menu on the left side of your screen, and click Manage next to your website’s name.
- Search for SSL and open its settings.
- Click on the Install SSL button.
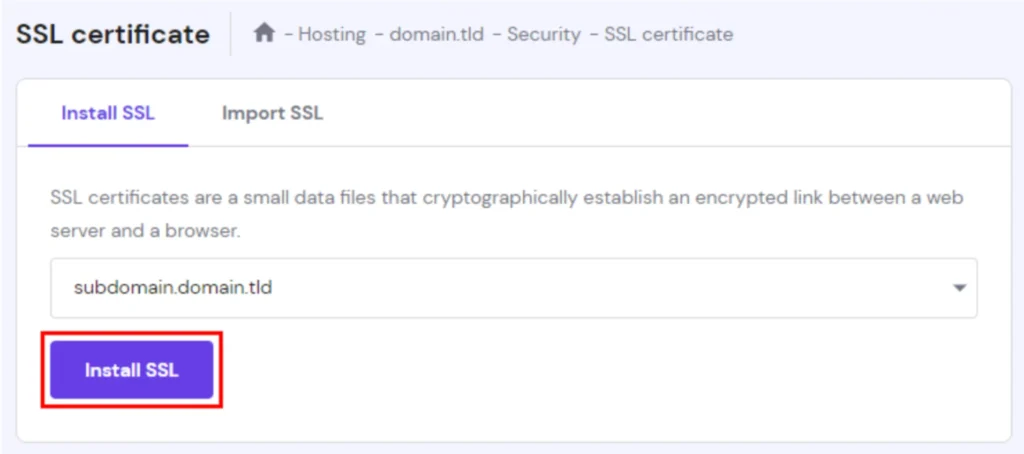
Once toggled on, it can take a little time for the SSL to fully install and activate. Keep an eye on your email in case further instructions are required.
That’s it—you’re done!
But if you’re not using Hostinger or can’t get a free SSL from your hosting provider, continue with the remaining steps below.
#3 – Generate an SSL certificate
How you’ll procure the SSL certificate depends on whether you’ll buy it from a third-party certificate authority or avail of your hosting provider’s free SSL.
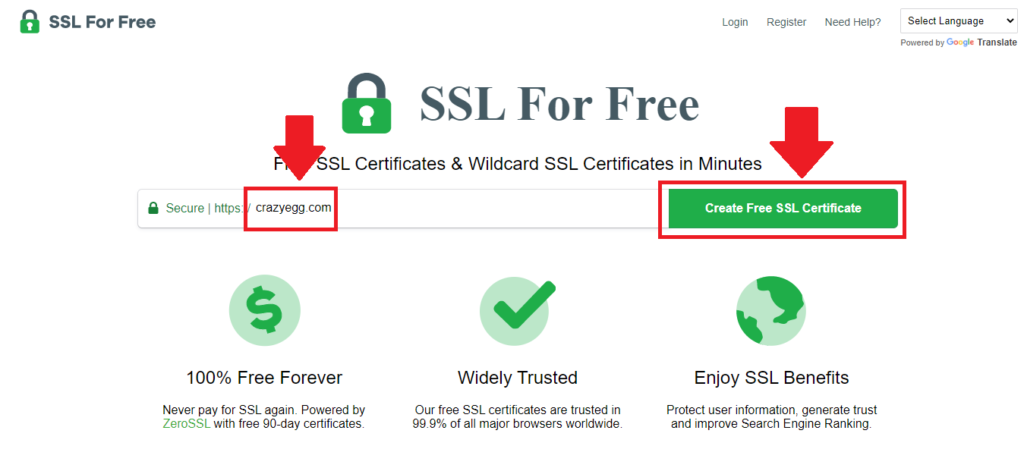
To get started, go to sslforfree.com. The website is powered by ZeroSSL, a provider that distributes free 90-day SSLs and also offers paid one-year and wildcard options.
Type in the domain name of the website you want to secure and click Create Free SSL Certificate.
Register a new account using your email address and preferred password.
Double-check if you’ve entered the correct domain name, then click Next Step.
You’ll be offered a free 90-day certificate, and you can also pick a paid one-year option if you don’t want to renew as often. Choose the one you want and click Next Step.
The Auto-Generate CSR option is selected by default. Simply uncheck this if you want to enter your contact details shown on the certificate manually. Then, click Next Step.
Pick the free plan and finalize your order. When you finish this step, the site will create a free SSL certificate for you. However, it won’t work unless you verify ownership of your domain.
#4 – Verify domain ownership
Before the certificate authority can issue you an SSL certificate, you must first ensure you own the domain name. You can verify ownership of the domain in three ways: Email Verification, DNS (CNAME), or HTTP File Upload.
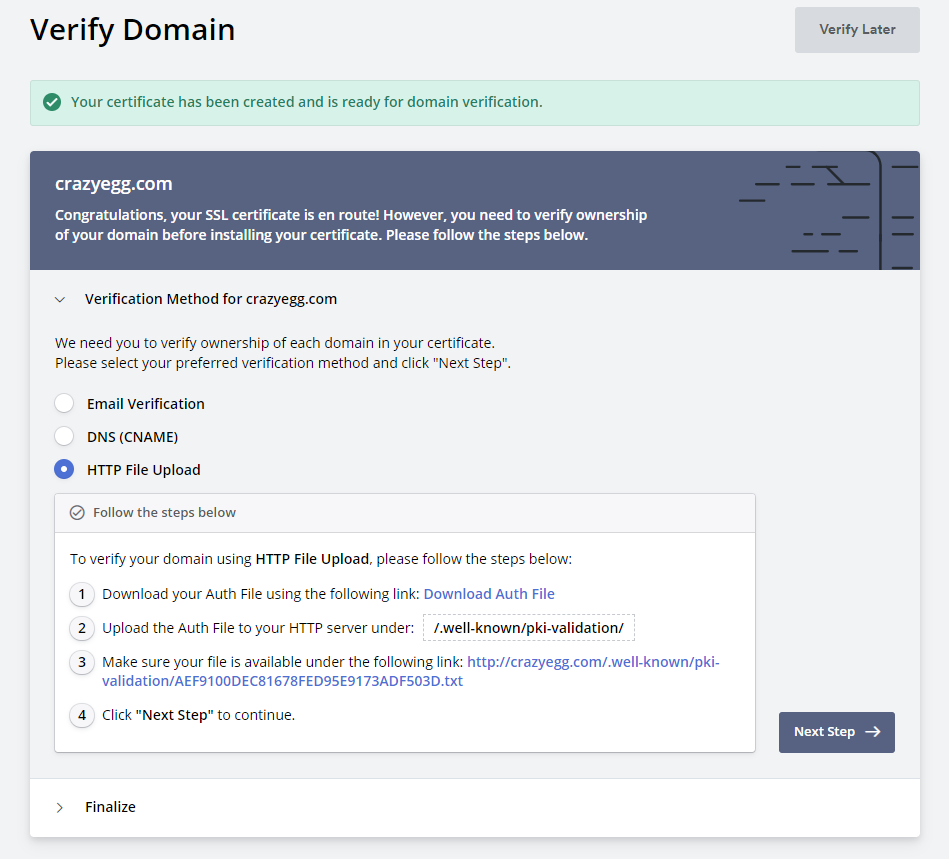
For fast verification, completing the process through HTTP File Upload is recommended.
To do this, download the Auth File using the link provided. Then, open your control panel.
Once inside, go to your File Manager. Create a folder inside the public_html and name it .well-known and then a subfolder named pki-validation inside it. In this subfolder, upload the file you downloaded previously.
Go back to sslforfree.com and click the link provided in the third step of the verification process. If you’re able to open the link, it means you have successfully uploaded the Auth File. Click Next Step.
Finalize domain verification by clicking Verify Domain.
#5 – Install the SSL certificate
Now that domain ownership has been verified, your free SSL certificate is ready to install.
Click Certificates on the ZeroSSL menu and then select Download Certificate. Set the Server Type to Default Format, then download the zip file containing your certificate.
This file should contain three sets of keys:
- Certificate (certificate.crt)
- Private key (private.key)
- Certificate authority bundle (ca_bundle.crt)
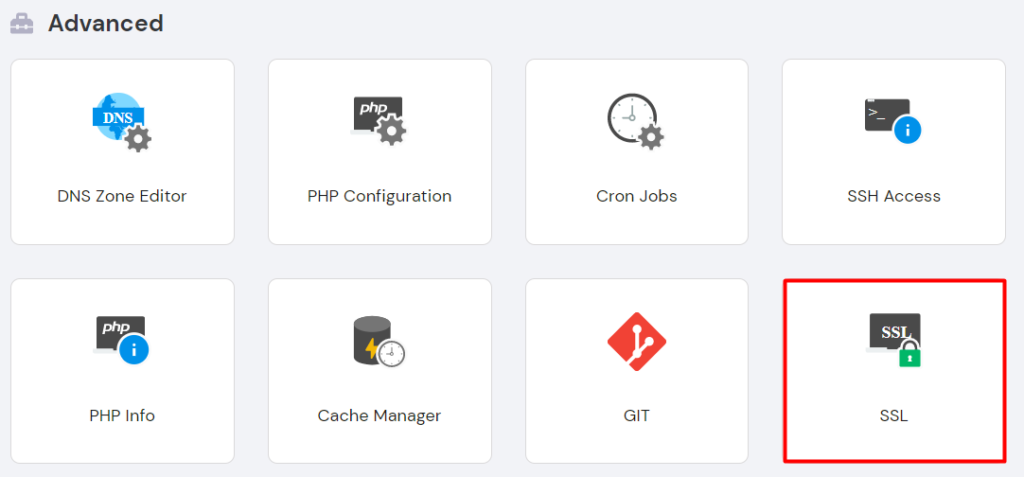
Return to your control panel and navigate to the your SSL or Security menu (this will vary based on your host). Scroll down to the Custom SSL, where you’ll paste the keys you’ve obtained from ZeroSSL to their corresponding boxes.
Finally, click Install.
Take note that if you’re using a free SSL certificate and you don’t automate it, you will have to repeat the steps above every 90 days. Many hosts (and ZeroSSL via ACME) can auto-renew for you, so enable auto-renewal if it’s available.
#6 – Configure WordPress to use HTTPS
By default, WordPress can still serve images and media files in their non-secure HTTP versions, leading to mixed content errors. External links pointing to your website also don’t change automatically once you install an SSL certificate. As a result, anyone discovering your website through a social media link may end up running away from it once the “Not Secure” warning shows up.
To fix this, you must force WordPress to use HTTPS throughout your whole website.
A simple way to do this is by logging into your WordPress dashboard and going to Settings, then General. You’ll then see two fields named WordPress Address (URL) and Site Address (URL), both of which contain the non-secure HTTP URL of your website homepage.
Remove the HTTP prefix in both fields and replace it with HTTPS. Once you’re done, click Save Changes.
At this point, your WordPress site should already be showing the HTTPS version of its URLs. However, this update only covers the URLs within your website, not all the links pointing to your website that remain on the non-secure HTTP. To solve this problem, you can manually set up a 301 redirect by editing the .htaccess file in your web host account. This file is the direct link between your server and WordPress site, so one wrong move can have drastic consequences.
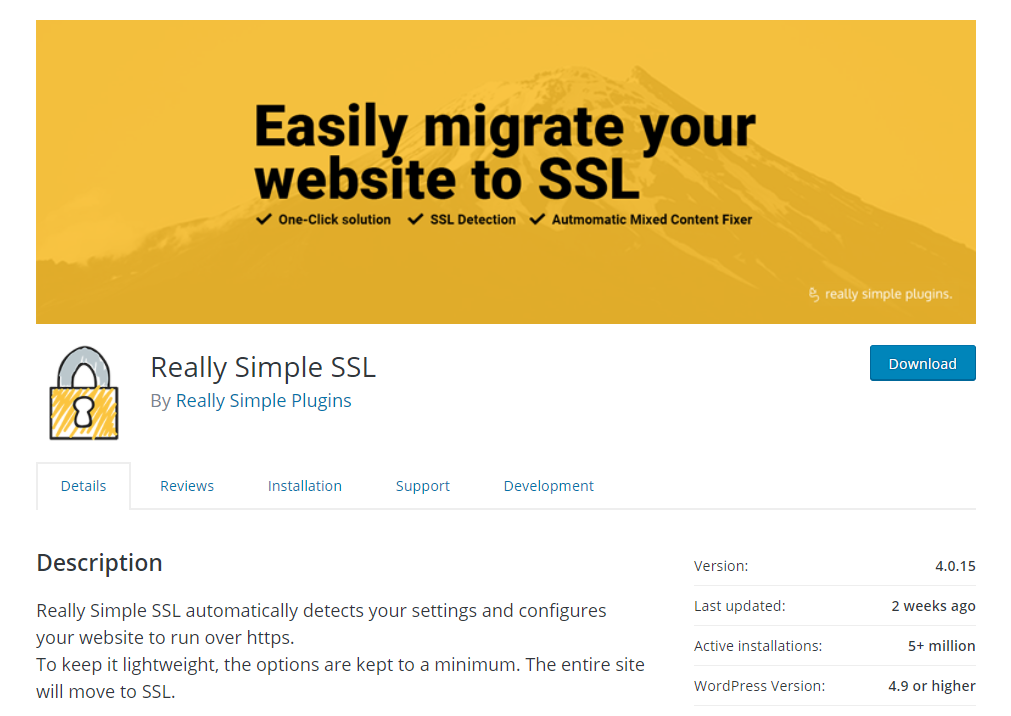
An easier alternative to altering your site codes is by installing a plugin called Really Simple SSL. Once activated, this plugin automatically detects your SSL certificate, fixes all mixed content errors, and redirects all HTTP URLs to HTTPS.
The only potential downside is a plugin takes up space. In addition, you also need to keep the plugin installed and active otherwise, the mixed content errors will persist.
#7 – Confirm if your SSL certificate is working
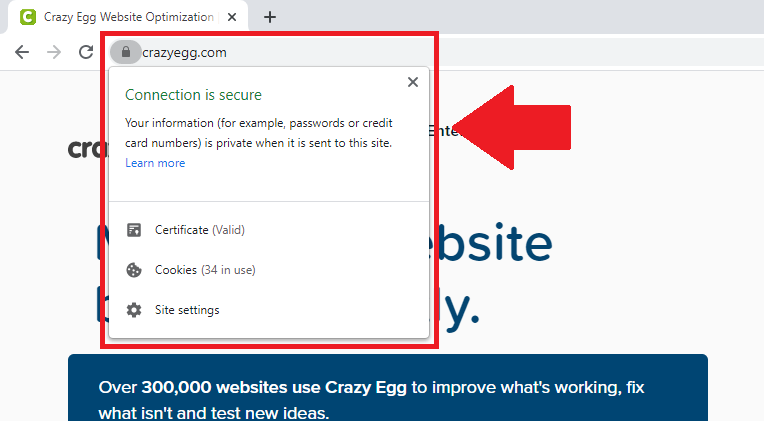
If everything is set up correctly, your website URL should already show the secure HTTPS instead of the non-secure HTTP.
To validate if your certificate is up and running, log out of WordPress and your web host control panel. Then, visit your website and check whether all the following security components are present:
- HTTPS address
- Security icon (lock or tune icon, depending on the browser) next to the URL
- Security details showing the issuing certificate authority
- Business name inside the certificate details (for OV/EV certificates)
To get more details, click the security icon and then expand the Certificate. Verify if the certificate’s details, including the certificate authority and the certificate validity period, are correct.
If you’re unable to find any or all of the trust details listed above, reach out to your hosting provider and ask for assistance. Depending on the type of error you encounter, the SSL certificate may have to be removed and reinstalled.
#8 – Submit your HTTPS site to Google Search Console
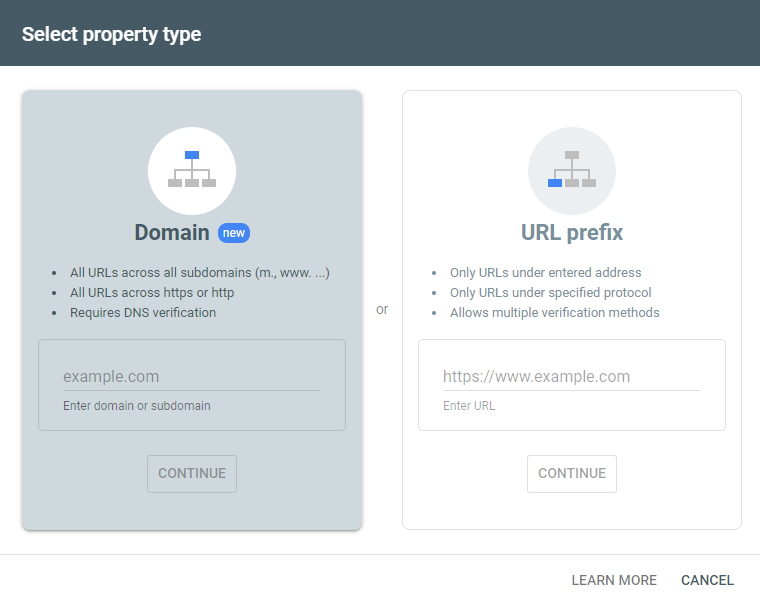
Google still treats HTTP and HTTPS as separate protocols, but the easiest way to manage them now is to add your domain to Google Search Console using the Domain property type. This single property covers both http and https versions and all subdomains, so you don’t have to add each one separately.
Open Google Search Console and click Add Property. Choose the Domain option, enter your domain name without the protocol, and click Continue.
Verify ownership using the method you’re most familiar with—typically a quick DNS TXT record at your domain registrar.
Once your site is verified, submit your HTTPS sitemap. As long as you correctly accomplished the redirection process, Google will gradually replace all the indexed HTTP links with their new and secure HTTPS counterparts.
Next Steps
Building a web-based business or an online presence used to require steep upfront fees. But as proven by this article, you can get your website ideas off the ground without breaking the bank.
However, getting cheap web hosting that comes with a free SSL certificate is just half the battle. Now you need a website builder that can help you create beautiful and professional-looking websites on a budget. See our top picks for the best free website builders to help you get started.