In our previous posts we spoke about how to optimize your Facebook ads to get more clicks and how to split-test them to determine which ads are working. Optimizing your ads to increase clicks and decrease costs is great but your campaign doesn’t end there.
Clicks and costs are useful metrics but they don’t give you the whole picture, and at times they can be misleading. The problem is, while CTRs tell you what percentage of people clicked on your ad, they don’t tell you what these people did after landing on your site. Did they sign up? Did they buy anything?
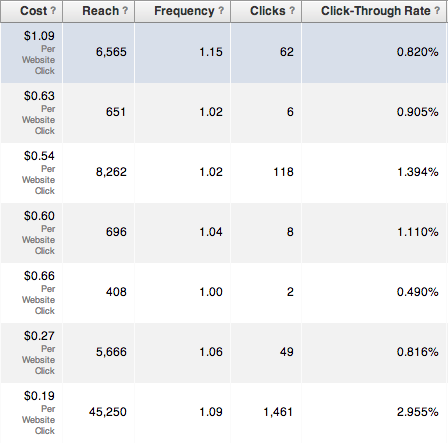
Take this example from one of my early ad campaigns on Facebook. This was for a landing page to collect e-mail subscribers.
If we took only CTRs into account, the last seems to be the best, going at a whopping 3%. As for CPCs, the first ad looks really expensive at $1 a click. In terms of getting clicks, the last ad is the winner. But it doesn’t tell me anything about what’s happening after the click. Are clickers going on to subscribe?
Yet that’s where the real value of an ad campaign lies, right? You’re not paying money so that people can click to your site. You’re paying so that you’ll get a proportional return via sales or leads. Money in, money out.
Thus, the ultimate goal of your ad campaign should be to optimize your ROI. Are you getting a positive return on your ad expenditure, and how can you increase that return without spending more?
That’s what conversion tracking is all about. By tracking conversions from your Facebook ads, you’ll be able to see how many ad clickers went on to convert. You’ll also see which ads were responsible for these conversions and which were duds, despite what the CTRs and CPCs say.
I didn’t learn this until it was too late. I made decisions based only on CPCs and CTRs and I cut out the wrong ads from my campaign. So if you’re starting a new ad campaign on Facebook, you need to track conversions right from the start and this post will show you what steps you need to take.
Step 1. Define your goals
When you set up conversion tracking on your ads, you can define exactly what you mean by a conversion. Facebook allows you to track pretty much any event on your site by placing a piece of code, or a pixel, on the page that a visitor lands on after completing the event.
With a clear goal in mind you’ll be able to track the right conversions. Do you want people to buy something? Are you looking for leads or subscribers? Or do you just want them to look at a certain page?
Step 2. Create the pixel
To create a conversion pixel you’ll need to go to the conversion tracking section of the ads manager. You can do this either through the regular interface or the power editor. Within this section you’ll find a green ‘Create Pixel’ button.
Then, pick a category specific to your campaign goals. You can track purchases on your online store, track registrations to your webinar or event, tracks newsletter subscriptions and leads, or pretty much anything you want.
Give it a name, so that you can identify it later when adding it to your ads, and then create the pixel. Facebook will then generate the code you’ll need to stick into your website.
Step 3. Give the pixel a value
Facebook allows you to add a monetary value to each conversion. This isn’t immediately obvious to most people, but if you’ve run ads with conversion tracking before, you’ve probably wondered why the conversion value was always 0. That’s because 0 is the default value.
To change the value, you’ll need to hard-code it into the pixel code you generated. Search for the window._fbq.push function and change the parameter value to the dollar amount you think each conversion is worth.
For example, if you’re selling an infoproduct with a one-time payment, simply enter the price of the product as the conversion value. For SaaS products with multiple price tiers, or businesses with multiple products, you can enter an average customer value or a dynamic variable that changes based on what each customer actually bought.
Conversion values are an extremely important feature that most people ignore simply because they don’t know how it works. Adding a value will give you a more accurate analysis of your ROI in terms of actual dollars. Every time a conversion takes place, you’ll be able to see how much money was made off that conversion versus how much was spent to get that conversion.
Step 4. Place the pixel on your page
After modifying the code, you need to paste it between the ‘head’ tags (<head> and </head>) of the page you want to track conversions on. Remember, you need to place this code on the page that the visitor lands on after completing your goal.
For example, if you want to track purchases, you have to place the code on the page the customer sees after making the purchase, not on the product page or the cart page. Similarly, if you’re collecting leads or subscribers, place the code on the ‘Thank You’ page and not on your landing page.
This is a basic mistake that many people make when tracking conversions for the first time. They drop the code into their landing page and then end up with incorrect results.
Once the pixel is in place, you’ll be able to see it in the conversions tracking tab in your ads manager. If it’s set up correctly, it should show a status of verified.
Step 5. Start tracking
With the pixel set up, you can link it to your ads and track conversions. You only need one pixel even if you have a hundred ads in your campaign, as long as your goal is the same for each ad.
To add your pixel, go to your ads and then edit the creative section. In the advanced options you’ll see a dropdown where you can select the appropriate conversion.
If you don’t have ads set up already, you can create a new one by selecting website conversions. You then enter the URL and select the associated conversion pixel. Again, the URL you enter is the one you want visitors to land on after clicking you ad, not the page your pixel is on.
Don’t worry if the pixel is inactive. This just means it hasn’t been triggered yet by anyone visiting the page. Once someone converts, it will change to active.
Once you’re up and running you’ll start seeing the data in your ads report. For each ad, you can see how many people have gone on to convert on your site, how much you paid to get the conversion, and how much you made from each conversion.
Step 6. Optimize for ROI
This is what your entire campaign boils down to. You’re advertising your business to make sales or capture leads, so the metrics that matter are how many conversions you make on your site and whether those conversions are profitable.
Make sure your ad bidding is set to optimize for conversions. Facebook will then show your ad to people who are more likely to click through and convert on your site.
Next, start split-testing your ads using the same conversion pixel. You’ll still be able to see the CTRs and CPCs for each ad, only this time you’ll also see how many conversions each ad drives.
After running the ads for a few days, the differences will become clear. Some ads may be getting clicks but not generating even a single conversion, while other ads may not be getting too many clicks but will be getting you sales or qualified leads.
Keep the ads that are making you more money than you spend, and cut out the ads that are losing money. Rinse and repeat.
Let’s Go Back to My Ad Campaign
Because the ad was for e-mail subscribers, I thought I wouldn’t need to use a conversion pixel. I was giving away something for free, a hook, so I assumed that most people who clicked on the ad would go on to sign up, regardless of what version they saw. I figured I just had to optimize for CTR and the landing page would take care of conversions.
So I created some ads, split-tested them, and ran them for a few days. The image shows the results of my ads at the end of the campaign. I decided to keep running the last ad for the entire campaign, which is why it got over 45,000 impressions.
I slowly started cutting out the remaining ads. The first one seemed especially expensive, with a CPC of $1. Without any insight on the ultimate conversion rate for that ad, it just seemed like a waste of money.
But, with the addition of the conversion pixel, the story changes. It turns out that the people who clicked on the last ad didn’t convert that well on the landing page. Only 6% of clickers went on to convert. On the other hand, those who clicked on the first ad converted very well at a rate of over 30%!
Basically I was paying more per conversion for the last ad than I was for the first one. In terms of ROI, the first ad was the best performer, but I didn’t know this until it was too late. By the time I used the conversion pixel, I’d already blown through most of my budget. If I had started earlier, I’d have way more subscribers.
Why did this happen? Why were the landing page conversions different based on the ads? For these two ads, I was split testing audience. The first ad had a very well-defined and targeted audience, while the last one had a loosely defined audience.
I suspect that the people who saw the first ad only clicked on it if they felt like my hook was valuable to them. They were basically picky about what they wanted, which explains why the CTR was low. When they landed on my site they had already decided they wanted what I was offering, so they signed up.
The last ad got a very high CTR because people were curious. They got a glimpse of my hook and they wanted to learn more about what it was. Unlike the first group, these people didn’t click with the intention of subscribing. So when they got to my page, most of them realized they weren’t interested (a direct result of the loose targeting) and they didn’t sign up.
Conversion tracking makes a massive difference to your ad campaign. It gives you deeper insights into what’s really happening behind all your ads. At the end of the day, you want to make profits, and conversion tracking shows you exactly which ads are doing that for you.
If you aren’t tracking conversions with your ads and optimizing for ROI, you might be throwing money away. Start now and get your campaign under control.
Read other Crazy Egg articles by Sid.


